Embedding a Form
Building a form and showing it to customers are two separate steps. Once you've built a
form under Content > Elements > Forms, you can place it on your storefront in several
ways: through the Hyvä CMS editor, with a Magento widget or widget shortcode, or, for
developers, through layout XML and .phtml templates. Pick the approach that fits your
use case. In every method the form is addressed by its identifier, and only the
published version of an active form is rendered.
Using the Hyvä CMS Editor
- Open (or create) a CMS Page or Block in the Hyvä CMS Liveview Editor.
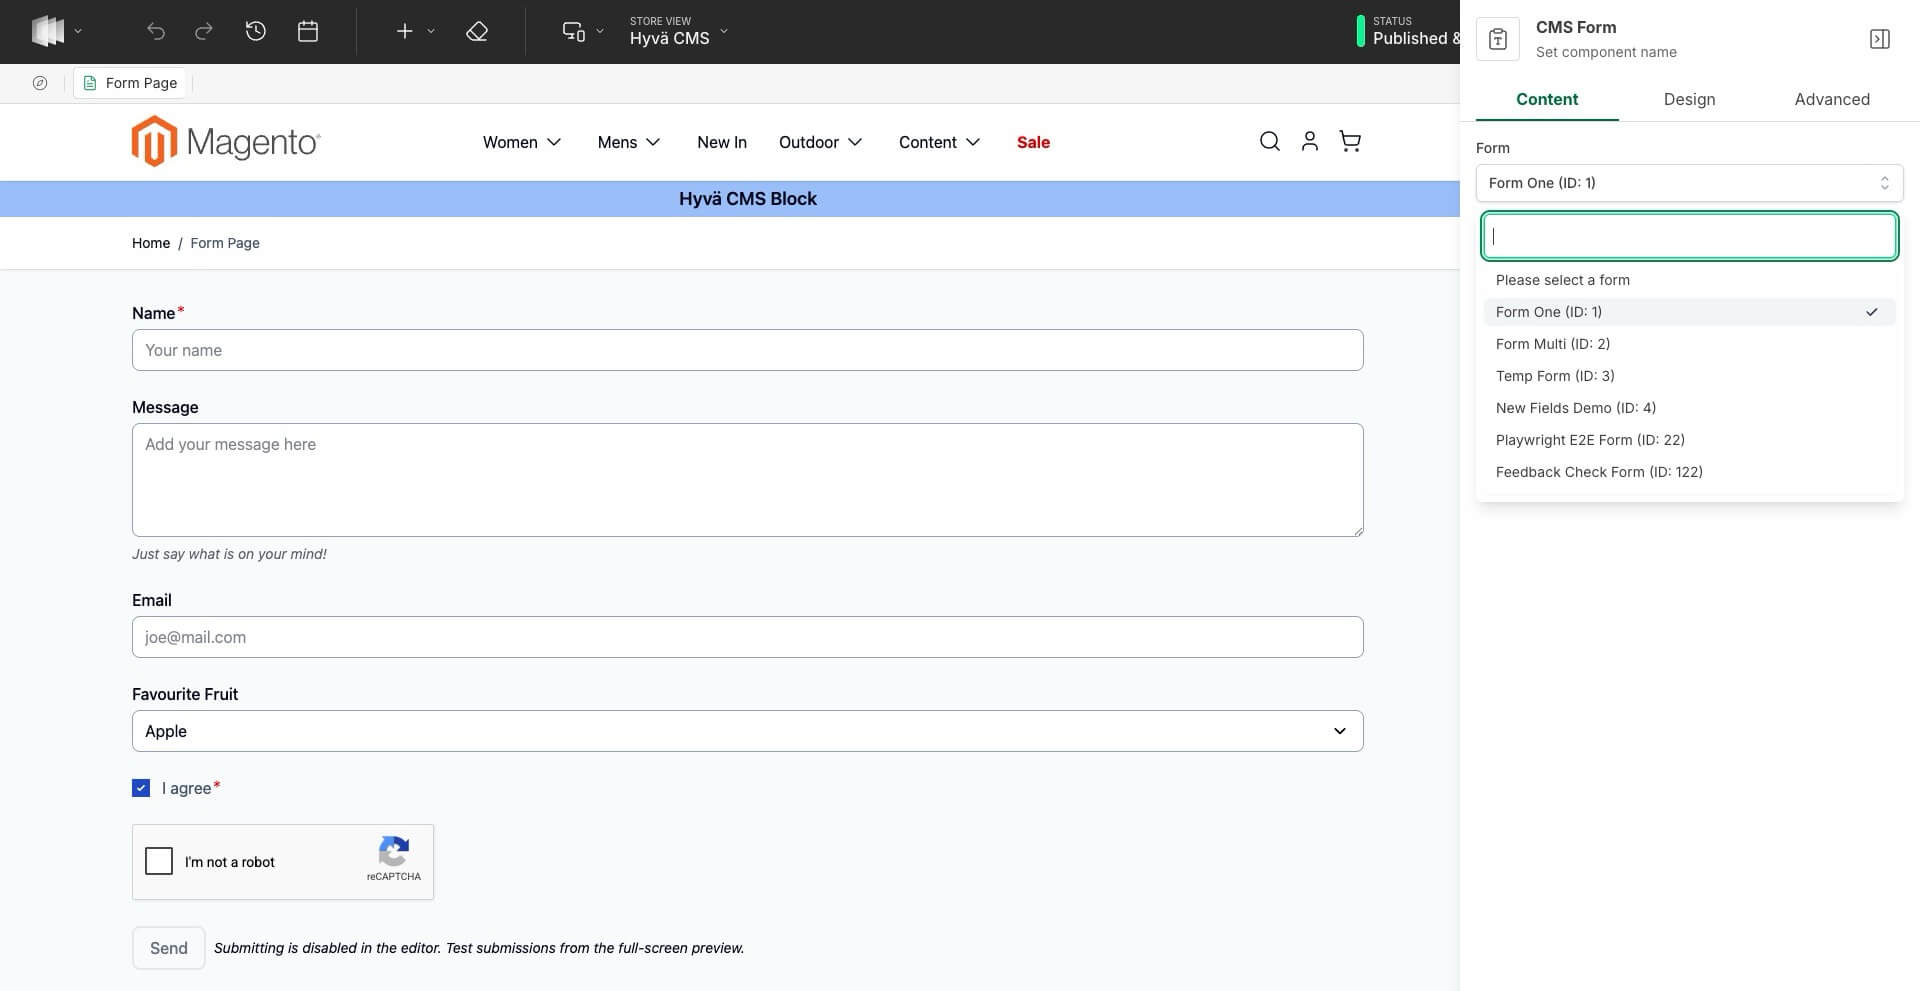
- Click Add a Component and choose Hyvä CMS Form.
- In the component's property panel, use the form picker dropdown to select the form you want to embed. Forms are listed by their identifier, so give your forms clear identifiers when you build them.
- Save or publish the page or block as usual.
The selected form now renders wherever you placed the component. To move it, restyle its surroundings, or embed the same form in more than one place, treat the Hyvä CMS Form component like any other CMS component. Its Design tab carries Background Color and Text Color, which style the card the form is rendered in, so the form takes its colors from the content hosting it rather than carrying its own.
Preview the page or block and the embedded form is live: you can submit it and the submission really sends, marked as a test. An embedded form always renders the published version of the form, so publish it before you preview the page. See Testing a form.
Give forms clear identifiers
The form picker lists forms by identifier, so a descriptive identifier such as
contact_us or newsletter_signup makes the right form easy to find when you embed
it. Set the identifier when you first build the form - see
Building Forms.
Using Magento Widgets
Magento widgets let you place a form in specific page layouts without touching template files: sidebars, category pages, or any other widget-compatible container.
- Open the widget manager: Go to Content > Elements > Widgets in your Magento admin.
- Create the widget: Click Add Widget and choose Hyvä CMS Form as the type.
- Set the location: Fill in the Storefront properties and add a layout update to control where the widget appears.
- Select your form: In the widget options section, pick which form to render.
Using Widget Shortcodes
Widget shortcodes let you embed a form directly in CMS content, static blocks, or anywhere else that processes Magento widget directives, handy when you're editing content and want to drop in a form without creating a formal widget.
Replace contact_us with your form's identifier.
Using Layout XML
Layout XML gives developers precise control over where a form appears and how it integrates with the theme's structure. This example adds a form to the main content container:
<referenceContainer name="content">
    <block class="Hyva\FormBuilder\Block\Widget\Form">
        <arguments>
            <argument name="form_identifier" xsi:type="string">contact_us</argument>
        </arguments>
    </block>
</referenceContainer>
The form_identifier argument specifies which form to render. Change the container
reference to match where you want the form to appear.
Using phtml Templates
When you're building custom templates, you can render a form directly in your .phtml files.
You have two approaches: define the form block in layout XML and reference it in your
template, or create the block dynamically in the template itself.
Approach 1: Define in Layout XML
Declare the block in your layout XML file:
<block class="Hyva\FormBuilder\Block\Widget\Form" name="hyva_form_block">
    <arguments>
        <argument name="form_identifier" xsi:type="string">contact_us</argument>
    </arguments>
</block>
Then reference the child block in your .phtml template:
This keeps your layout structure visible in XML and makes the template code simpler.
Approach 2: Create Block Dynamically
If you need to create the form block on the fly without layout XML:
<?= $block->getLayout()
    ->createBlock(\Hyva\FormBuilder\Block\Widget\Form::class)
    ->setFormIdentifier('contact_us')
    ->toHtml(); ?>
This is useful when the form identifier is dynamic or determined at runtime.
Forms are styled everywhere
A form carries its own compiled Tailwind CSS, so it renders fully styled on any page - category pages, product pages, or custom routes - not just on Hyvä CMS pages. If the form is missing, inactive, or has never been published, the embed renders nothing and the surrounding page is unaffected.
Related Topics
- Building Forms - create a form and set its identifier.
- Sending and Recipients - where submissions are delivered.
- Spam Protection - the built-in honeypot and turning on CAPTCHA.
- Testing a Form - test an embedded form from the preview of the page it sits on.
- Hyvä CMS Pages and Blocks - how CMS pages and blocks work.